Muzzleloader Straight Pull Plunger Style Action
In this part of the Welcome to Knight series we are talking about the Muzzleloader Straight Pull Plunger Style Action – also called the Plunger Style Action – which is available on the Bighorn, Littlehorn and the TK2000 Knight muzzleloaders.
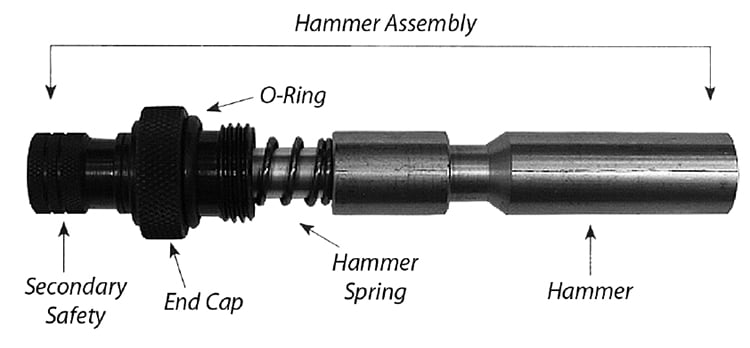
The pull type system functions by pulling the hammer assembly back from the receiver until it cocks. With both safeties off, the hammer under the spring tension is released with a pull of the trigger. The hammer slides through the receiver and strikes the primer. With the rifle primed, using a 209 primer in the red Full Plastic Jackets™, a spark moves forward through the breech plug and ignites the powder charge. Because Knight® Rifles’s ignition system is in line with the barrel, hammer release, primer firing, and powder charge ignition, it spontaneously gives a more uniformly burned charge with superior accuracy using a Muzzleloader Straight Pull Plunger Style Action.
Patented Double Safety System – Muzzleloader Straight Pull Plunger Style Action
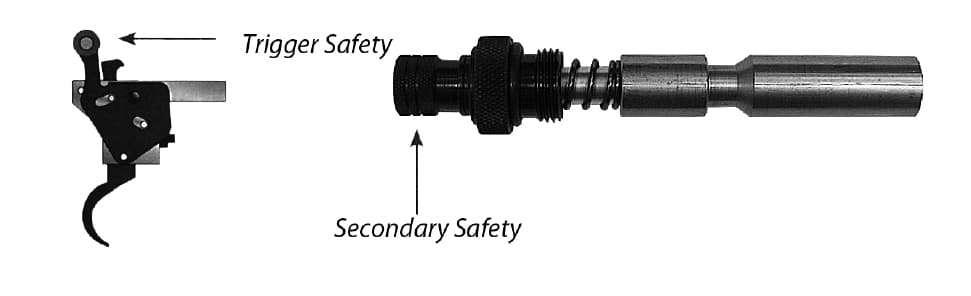
The trigger safety is located on the right side of the trigger. When the safety is pulled to the rear, it is in the safe position. This locks the trigger so that the hammer will not release. When the safety is pushed forward, it is in the fire position, and the hammer will release if the trigger is pulled.
The secondary safety is located on the rear of the hammer or bolt. This safety is activated by turning the secondary safety in a clockwise motion. The use and design of the secondary safety is to keep the rifle from firing by not permitting the hammer to strike the igniter. When the safety is turned in a counter-clockwise motion until it stops, it is in the fire position. Both safeties must be in the fire position to fire the rifle.
TK2000™ Shotgun
WARNING – Be sure the muzzleloader is not loaded or primed before disassembly or assembly.
Study the rifle schematic and acquaint yourself with the different parts and terminology of your muzzleloader before assembling or disassembling. Letters and numbers in parentheses refer to labels on each rifle schematic for each model.
It is advisable to use a padded vise to remove and reinstall the breech plug. Place small parts in a pan to avoid losing them.
Disassembly of Plunger Style Action
1.) Remove the ramrod (O) from the stock and set aside.
2.) Remove the barreled action from the stock. The barreled action is held in the stock by a single stock screw (S9) located just forward of the trigger guard (W). Remove this screw and carefully separate the barrel assembly from the stock (R). Set the stock aside.
3.) Remove the trigger assembly. Remove the trigger mounting screw (7), and lift the trigger assembly from the receiver.
4.) Remove the hammer assembly. Unscrew the end cap (D) in a counter-clockwise direction. Pull the hammer assembly backward removing the hammer from the receiver.
5.) Remove the breech plug. Insert the combo tool (breech plug wrench side) into the receiver, engage the breech plug (I) and turn it counter-clockwise. This may require a considerable amount of force. (Holes in the combo tool allow a rod to be used for added leverage).
Assembly of Plunger Style Action
1.) Install the breech plug. Fill the threads of the plug with Knight® Breech Plug Grease™ to help prevent the breech plug from sticking in the receiver. Using the breech plug end of the combo tool, insert the breech plug (I) into the rear of the receiver and hand tighten the plug into the receiver until it is firmly against the back of the barrel. Be sure the breech plug is screwed all the way into the receiver. Do not over-tighten the plug or it will become difficult to remove.
2.) Install the trigger. Using the trigger mounting screw (S7), mount the trigger assembly (Q) to the receiver. Tighten until the trigger assembly is firm against the receiver. Make sure it is aligned with the receiver.
3.) Install the hammer. Place the trigger safety in the forward fire position. While pulling the trigger back, slide the hammer assembly (A) into the receiver and past the trigger sear. Screw the end cap (D) clockwise into place, finger tight.
4.) Install the barrel and stock. Place the barreled action into the stock and tighten the stock screw (S9). Install the ramrod (O).
—————
If you have any questions or concerns or looking for more information please feel free to contact our very knowledgeable staff by calling 1-866-518-4181.
Happy hunting everyone!
Have Questions?
If you have questions about Muzzleloader Straight Pull Plunger Style Action, please email us at sales@knightrifles.com.